- DIRECT CONTACTS:
- +256394517569
- tours@safarioclock.africa
How to Compose Wildlife Images When Space Is Limited

How to Prepare Camera Batteries for a Long Trek
November 11, 2026
Photographing Gorillas Through Dense Vegetation: Practical Tips
November 19, 2026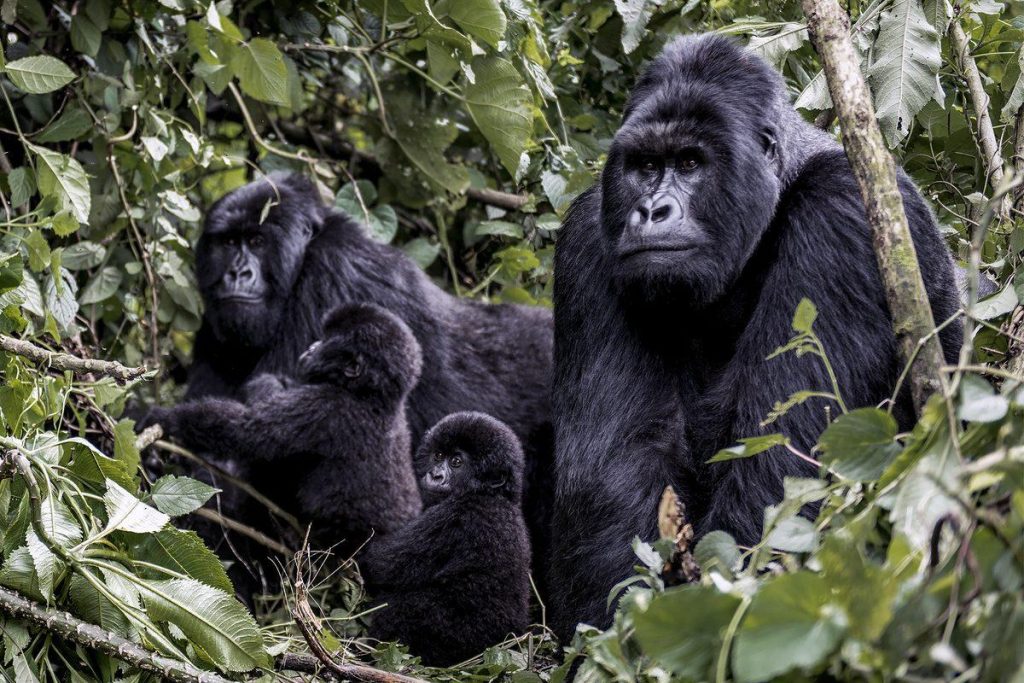
Wildlife photography is one of the most exciting parts of a safari experience. However, capturing a beautiful photograph is not always easy. Sometimes, photographers have very little room to move. They may be seated inside a safari vehicle, standing on a narrow forest trail or observing animals through thick vegetation. In other situations, park regulations and safety guidelines limit how close visitors can get to wildlife. These challenges require creativity, patience and good photographic skills.
Fortunately, limited space does not have to limit the quality of your photographs. Understanding how to arrange subjects within a camera frame can help you capture attractive and meaningful wildlife images. Good composition allows photographers to use available surroundings, natural light and different perspectives to improve their pictures. It also helps them tell a story without disturbing the animals.
At Safari O’clock, we encourage travellers to appreciate every moment in the wild. Whether you are exploring the African savannah or participating in a mountain gorilla trekking adventure, knowing how to compose wildlife images can make your photography experience more rewarding. With the right techniques, even a small shooting space can produce remarkable photographs.
Understanding Wildlife Image Composition in Small Spaces
Wildlife image composition refers to how photographers arrange animals and other visual elements within a photograph. It involves choosing where the subject appears, what enters the frame and how the background supports the main subject. When space is limited, these decisions become even more important.
For example, a photographer observing an elephant from inside a safari vehicle may not have the freedom to change position. Similarly, a visitor photographing a mountain gorilla in a dense forest may have limited visibility because of surrounding trees and vegetation. Instead of struggling to find a completely open position, photographers can work with the available environment.
The first step is to identify the main subject. Decide whether you want to capture the entire animal, its facial expression or a particular behaviour. Once you identify the subject, look for elements that can support the photograph. These may include tree branches, rocks, leaves, grass or the surrounding landscape.
A successful photograph does not always need to show the entire animal. Sometimes, a close-up of a gorilla’s face, an elephant’s textured skin or a bird resting on a branch can communicate more emotion than a wide photograph. The important thing is to make every element in the frame contribute to the story.
Use the Rule of Thirds for Better Wildlife Image Composition
The rule of thirds is one of the most useful photography techniques, especially when photographers cannot move freely. It involves dividing the camera frame into nine equal sections using two horizontal and two vertical lines. Many modern cameras and smartphones have a grid option that makes this technique easier to apply.
Instead of placing the animal directly in the centre, try positioning it along one of the grid lines or near an intersection. This creates visual balance and gives the surrounding environment room to contribute to the photograph.
For instance, imagine photographing a giraffe standing between trees. Positioning the giraffe towards one side of the frame can create room for the surrounding vegetation. The photograph then shows both the animal and its natural habitat. This approach is useful when working from a stationary position.
However, the rule of thirds is not compulsory. Some wildlife scenes look stronger when the animal appears in the centre. A frontal gorilla portrait, for example, may benefit from a balanced central position. The goal is to use the technique as a guide rather than a strict rule.
Choose the Best Camera Angle When Space Is Limited
Your camera angle can completely change the appearance of a wildlife photograph. Even when you cannot move far, small adjustments in camera direction can create a different perspective.
Whenever it is safe and permitted, try photographing animals from their eye level. This approach creates a stronger visual connection between the viewer and the subject. It can also make the animal appear more natural and engaging.
During a safari, photographers may capture animals from a seated position inside a vehicle. In this situation, lowering the camera towards the window can help reduce the appearance of shooting down at the animal. However, never lean outside a vehicle or ignore your guide’s safety instructions.
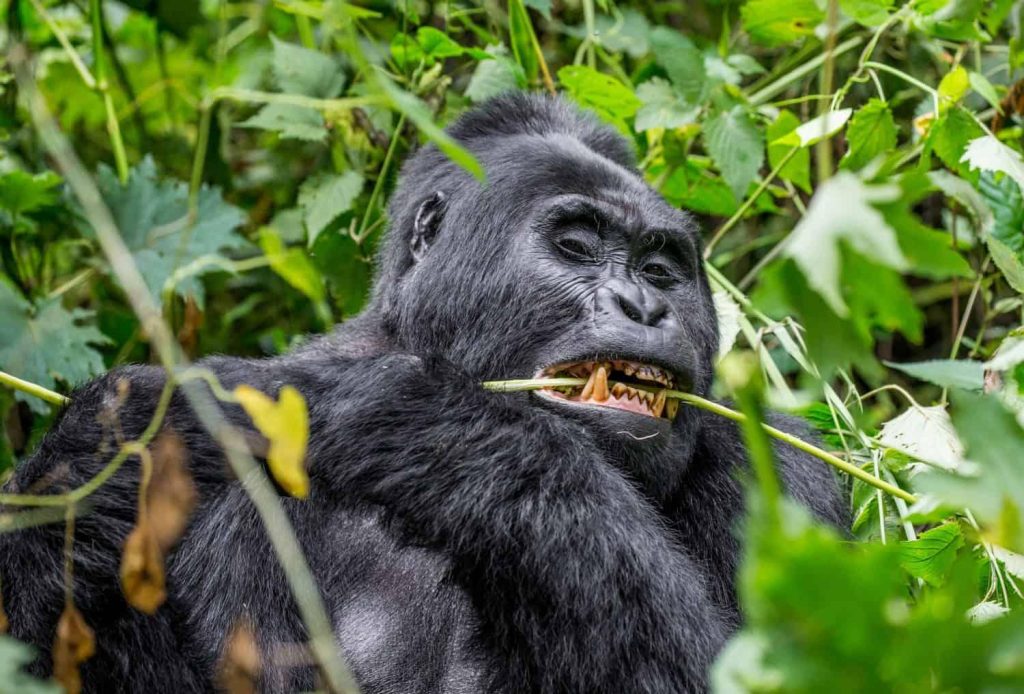
Forest photography presents different challenges. Thick vegetation may prevent visitors from changing their position. Instead, look for a clear opening between leaves or branches. A small adjustment in camera direction may reveal the animal’s face or eyes more clearly.
You can also experiment with vertical and horizontal framing. Vertical photographs work well for tall animals such as giraffes and elephants. Horizontal images are useful for animals moving across open landscapes. Both orientations can help you make better use of the available space.
Use Natural Frames to Improve Wildlife Image Composition
Natural framing is an effective way to create attractive wildlife photographs without needing additional space. It involves using objects in the environment to surround or highlight the main subject.
Branches, leaves, tree trunks and rock formations can all serve as natural frames. For example, a photographer observing a monkey in a forest can photograph it through an opening between leaves. The surrounding vegetation creates depth and gives the photograph a stronger connection to the animal’s habitat.
This technique is particularly useful during gorilla trekking in Bwindi Impenetrable National Park and Mgahinga Gorilla National Park. The forests contain thick vegetation, large trees and natural openings. These features can become valuable elements in wildlife photography.
However, natural framing requires careful attention. Too many leaves or branches can hide important details. Therefore, look for openings that allow the animal’s face or body to remain visible. You can also use a wide aperture to soften nearby vegetation and separate the subject from the background.
Remember that natural frames should improve the photograph rather than compete with the animal. Never break branches, remove vegetation or disturb the habitat to create a better camera position.
Control the Background for Cleaner Wildlife Photographs
A good wildlife photograph depends on more than the animal itself. The background plays an important role in determining how clearly viewers see the subject.
Busy backgrounds can make photographs look confusing. For example, a zebra photographed against several overlapping trees may blend into the surrounding patterns. Similarly, a bird photographed against bright branches may become difficult to distinguish.
When space is limited, changing your physical position may not be possible. Instead, adjust the direction of your camera slightly. Look for a darker, brighter or less crowded section of the background that makes the animal stand out.
You can also use a wide aperture to create a softer background. This technique reduces the sharpness of surrounding details while keeping the main subject in focus. It works particularly well for close-up wildlife portraits.
If you are using a smartphone, try its portrait or background-blur mode when appropriate. However, check the result carefully because artificial background effects can sometimes blur parts of an animal incorrectly.
Safari O’clock encourages travellers to observe the entire scene before taking photographs. A few seconds spent checking the background can make a significant difference to the final image.
Make Use of Negative Space in Wildlife Image Composition
Negative space refers to the empty or less detailed areas surrounding the main subject in a photograph. It can include open sky, grassland, water or a simple section of forest.
Many photographers feel that every part of a photograph must contain something interesting. However, leaving some areas empty can make an image more attractive. Negative space allows the animal to stand out and gives viewers a place to rest their eyes.
For example, when photographing a bird sitting on a branch, leave some space in front of its beak. This creates a natural direction for the viewer’s eyes to follow. The same principle applies when photographing an animal looking towards the edge of the frame.
Negative space is also useful when capturing animals in motion. If a buffalo is walking towards the right, leaving room on the right side creates a sense of movement. Without this space, the animal may appear trapped against the edge of the photograph.
When working in a crowded forest, look for simple areas between trees or patches of open vegetation. You do not need a large empty background to apply this technique. Even a small area of visual simplicity can improve the composition.
Use Zoom Lenses Instead of Moving Closer to Wildlife
Limited shooting space often makes photographers feel that they need to move closer to their subjects. However, approaching wild animals can create unnecessary risks and disturbance. A suitable zoom or telephoto lens offers a better solution.
Telephoto lenses allow photographers to capture distant animals without physically approaching them. They are especially useful during safari drives, bird photography and gorilla trekking experiences where visitors must respect designated viewing distances.
A zoom lens also provides flexibility. You can photograph a full animal when it is standing in an interesting environment. Later, you can zoom in to capture facial expressions, fur patterns or other details.
However, using a long focal length requires steady camera handling. Camera movement can make photographs appear blurry, especially when working with distant subjects. Use an appropriate shutter speed, stabilisation features or a secure support when permitted.
Smartphone users can also benefit from optical zoom where available. Avoid relying too heavily on digital zoom because excessive enlargement can reduce image quality. Whenever possible, use the camera’s optical capabilities and maintain a stable grip.
Most importantly, remember that photographic equipment should help you respect wildlife space. Never use a lens as an excuse to approach animals beyond permitted limits.
Capture Wildlife Details Instead of Always Photographing the Entire Animal
When photographers have limited space, focusing on smaller details can create unique images. You do not always need a full-body photograph to tell a compelling wildlife story.
Consider the different details that make each animal special. You could photograph the texture of an elephant’s skin, the patterns on a zebra, the feathers of a bird or the expressive eyes of a mountain gorilla.
Close-up photography also allows you to explore interesting shapes, colours and textures. These details can communicate the beauty of wildlife in a different way.
For example, during a gorilla trekking experience, a photograph showing a gorilla’s hand resting on vegetation can tell part of the story of its natural behaviour. Similarly, a close-up of a silverback’s face can capture an expression that viewers might otherwise overlook.
However, always ensure that the animal remains comfortable with your presence. Follow the applicable park rules and maintain the required distance. Do not move closer simply to obtain a tighter photograph.
A good photographer knows when to capture the whole scene and when to focus on smaller details.
Adjust Camera Settings for Better Results in Confined Locations
Camera settings can help you make the most of difficult photography conditions. Limited space may also mean limited light, especially when photographing wildlife in dense forests.
Shutter speed is important because animals rarely remain completely still. A faster shutter speed helps freeze movement when an animal walks, runs or changes direction. For fast-moving wildlife, photographers often use speeds of 1/1000 second or faster, depending on the movement and available light.
However, static subjects may allow slower shutter speeds. Always consider the animal’s movement and the stability of your camera before choosing a setting.
Aperture also affects the appearance of your photograph. A wider aperture, represented by a smaller f-number, allows more light into the camera. It can also create a blurred background that separates the animal from surrounding vegetation.
ISO controls the camera’s sensitivity to light. In darker forest conditions, increasing ISO can help you maintain a faster shutter speed. Nevertheless, very high ISO values may introduce visible image noise. Find a balance that suits the lighting conditions.
If you are unfamiliar with manual settings, use aperture priority or an automatic wildlife mode. These options can help beginners capture good images while learning how their cameras work.
Work With Available Light When Space Is Restricted
Lighting can transform an ordinary wildlife photograph into an impressive image. However, photographers working in confined spaces may have little control over the direction or intensity of natural light.
Early morning and late afternoon often provide softer lighting conditions. These periods can create warm colours and gentle shadows. They are also popular times for wildlife viewing in many safari destinations.
Inside dense forests, light may be uneven. Some areas receive direct sunlight while others remain shaded. This can create bright patches behind an animal or dark areas across its face.
To manage these conditions, pay attention to where the light falls. Whenever possible, position your camera so that the animal’s important features remain visible. Avoid exposing the image too brightly when the background contains strong sunlight.
You can also use exposure compensation to adjust brightness when your camera struggles with difficult lighting. Check your photographs regularly and make small adjustments as conditions change.
Natural light is often enough for beautiful wildlife photographs. Avoid using flash unless the relevant wildlife authorities and professional guidance explicitly permit it.
Be Patient and Wait for the Right Wildlife Moment
Patience is one of the most important skills in wildlife photography. Animals behave naturally and do not follow a photographer’s schedule. Sometimes, the best photograph appears after several minutes of waiting.
When space is limited, patience becomes even more valuable. Instead of constantly changing your position, observe the animal and anticipate its behaviour.
A resting lion may eventually raise its head. A bird may turn towards the camera. A gorilla may look up from feeding or interact with another member of its family. These moments can produce stronger photographs than repeatedly taking pictures of the same position.
Watch the animal’s movements and keep your camera ready. Use continuous autofocus when photographing moving subjects. Burst mode can also help you capture different expressions or stages of an action.
However, do not pressure animals to perform or change their behaviour for your photographs. Never make noises, throw objects or move towards them to attract their attention.
The best wildlife photographs often come from observing quietly and allowing nature to unfold.
Follow Responsible Photography Practices in Protected Areas
Good wildlife photography must always respect animal welfare and conservation rules. A beautiful photograph is never worth disturbing an animal or damaging its habitat.
National parks and protected areas have specific guidelines for wildlife viewing. These rules may cover visitor distances, movement, photography equipment and the use of flash. Always follow the instructions provided by park authorities and professional guides.
During mountain gorilla trekking, visitors must follow the Uganda Wildlife Authority’s applicable gorilla viewing rules. These include maintaining the required distance, following the guide’s instructions and avoiding actions that could disturb the gorillas.
In addition, visitors should remain on permitted routes and avoid pushing through vegetation to obtain a clearer camera angle. Such actions can damage fragile habitats and create unnecessary disturbance.
Safari O’clock encourages responsible wildlife encounters throughout every journey. We believe that photography should celebrate nature while protecting the animals and environments that make these experiences possible.
Common Wildlife Image Composition Mistakes to Avoid
Even experienced photographers sometimes make mistakes when working in restricted spaces. Recognising these problems can help you improve your photographs.
One common mistake is zooming in too much. While close-up photographs can be attractive, excessive zooming may cut off important parts of an animal. It can also remove environmental details that help tell the story. Leave enough room around your subject unless you are deliberately creating a close-up portrait.
Another mistake is ignoring the background. A distracting branch, bright patch of sunlight or overlapping animal can draw attention away from the main subject. Always check the entire frame before pressing the shutter.
Some photographers also forget to change their camera orientation. Taking every photograph horizontally can limit creative possibilities. Try vertical framing when photographing tall animals or birds perched on branches.
Poor timing is another challenge. Pressing the shutter too early may capture an awkward position or an uninteresting expression. Observe the animal and wait for a more engaging moment.
Finally, never sacrifice safety or conservation rules for a better angle. A photograph should never come at the expense of wildlife welfare.
Final Thoughts on Wildlife Image Composition
Composing wildlife images when space is limited requires creativity, observation and patience. You do not need a large open area or expensive photography equipment to capture meaningful wildlife photographs. Instead, focus on making good use of the available surroundings.
Techniques such as the rule of thirds, natural framing, negative space, careful background selection and appropriate camera angles can improve your results. Zoom lenses and suitable camera settings can also help you capture distant animals without disturbing them.
Most importantly, remember that wildlife photography is about more than taking beautiful pictures. It is about appreciating animal behaviour, understanding natural habitats and respecting the environment.
With Safari O’clock, every wildlife encounter offers an opportunity to discover something special. Whether you are photographing elephants across the African plains or observing mountain gorillas in the forests of Uganda and Rwanda, thoughtful composition can help you preserve unforgettable memories.
Travel with Safari O’clock, capture nature beautifully and let every photograph tell a story worth remembering.